Asset Publisher
How to obtain the LPIS enclosures layer for CartoDruid from the information of your Autonomous Community
How to obtain the LPIS enclosures layer for CartoDruid from the information of your Autonomous Community
We have received several inquiries about how to obtain the LPIS layer of your area to use it in CartoDruid projects. In this post, we will teach you how to download the information from the Open Data portal of your Autonomous Community and how to build the LPIS layer from scratch and get it ready to work with CartoDruid.
This post is for advanced users, if you get stuck at any point, do not hesitate to consult us in the forum.
Prerequisites
- Have QGIS installed on your computer.
Procedure
These are the steps we will follow:
- Locate the LPIS layer in your Autonomous Community.
- Export the LPIS Layer to a Spatialite Database.
- Create the definitive LPIS layer and copy data from the downloaded layer.
- Build auxiliary layers, compress and create spatial indices.
- Load our LPIS layer in CartoDruid
Let's get started.
1. Locate the LPIS Layer on the Open Data Portal of Your Autonomous Community
In public administrations, great efforts have been made to make public information available to citizens, enabling the implementation of services and added-value solutions. Around this, there is a specific legal framework which you can consult in the references.
In implementing this legislation, the Autonomous Communities have developed Open Data portals through which citizens can download data or, in some cases, request access to it. It is on these portals that CartoDruid users can find LPIS layers in different cartographic formats. In this post, we will see how to import one of these layers and get it ready for use in CartoDruid.
Unfortunately, not all Autonomous Communities have the option to download or access LPIS data in vector format. In these cases, we recommend approaching the community's OpenData platform and requesting them in Shapefile format.
Below, we include the list of LPIS layers that we have found on the OpenData portals of the different Autonomous Communities. This list is updated as of 16-Nov-2023, but it is possible that we may have missed a resource by mistake (we apologize in advance for any omission).
You can find more information about the Autonomic Geoportals here:
https://www.idee.es/centros-de-descarga/autonomico
LPIS Andalusia
WFS service of LPIS enclosures until 2020
http://www.geoportalagriculturaypesca.es/geoide/lpis/wms?service=WMS&request=GetCapabilities
Dataset information
https://www.juntadeandalucia.es/datosabiertos/portal/dataset/poligonos-recintos-y-parcelas-lpis-2019
LPIS Aragon
Download in SHP format by province and municipality
https://idearagon.aragon.es/descargas
https://opendata.aragon.es/datos/catalogo/dataset/relacion-entre-parcelas-pac-codigos-catastrales-y-lpis-en-aragon
LPIS Asturias
No LPIS information found on the Open Data website of the Principality:
https://transparencia.asturias.es/open-data
LPIS Balearic Islands
Download in CSV, KML, and SHP format.
https://catalegdades.caib.cat/Medi-rural/LPIS-2023/w9cc-gen4
LPIS Canary Islands
LPIS viewer, no download information found.
https://www.gobiernodecanarias.org/agp/viceconsejeria/temas/lpis/
LPIS Cantabria
Map viewer, no possibility of downloading vector information
https://lpis-pac.com/lpis-cantabria/
LPIS Castilla-La Mancha
Map viewer, no possibility of downloading vector information
https://datosabiertos.castillalamancha.es/dataset/sistema-de-informacion-geografica-de-parcelas-agricolas-de-castilla-la-mancha-lpis
LPIS Castile and León
In this section, we have the cartography already prepared for use in CartoDruid.
https://www.cartodruid.es/cartografia
If you need any more datasets, consult the open data website of JCyL:
https://datosabiertos.jcyl.es/web/es/datos-abiertos-castilla-leon.html https://cartografia.jcyl.es/web/es/idecyl.html
LPIS Catalonia
Download in CSV, KML, and SHP formats by counties.
https://analisi.transparenciacatalunya.cat/browse?q=LPIS%202023&sortBy=alpha&utf8=%E2%9C%93
LPIS Ceuta
No LPIS download service has been found.
LPIS Extremadura
Download in SHP format by municipality.
http://sitex.gobex.es/SITEX/centrodescargas/viewsubcategoria/45
LPIS Galicia
Map viewer, with no possibility of downloading vector information
https://ovmediorural.xunta.gal/es/consultas-publicas/lpis
https://lpis-pac.com/lpis-galicia/
LPIS La Rioja
LPIS viewer of La Rioja and download of numerical data, no vector service found.
https://agro1.larioja.org/scapac/lpis/frameLpisAtributosRecintoPublico.jsp
https://www.iderioja.larioja.org/
LPIS Madrid
Download in SHP format by municipality
https://www.comunidad.madrid/servicios/medio-rural/lpis
https://idem.madrid.org/catalogocartografia/srv/spa/catalog.search#/metadata/spacm_atom_lpis
LPIS Melilla
No LPIS download service has been found.
LPIS Murcia
No LPIS download service has been found.
https://sitmurcia.carm.es/wfs
https://visoriderm.carm.es/
LPIS Navarra
LPIS download file
http://lpis.navarra.es/descargas/
LPIS Basque Country
Links for downloading SHP files of layers by provinces:
https://www.geo.euskadi.eus/cartografia/DatosDescarga/Agricultura/LPIS/https://opendata.euskadi.eus/catalogo/-/sistema-de-identificacion-geografica-de-parcelas-agricolas-de-la-capv/
LPIS Valencia
Download in SHP format
https://dadesobertes.gva.es/dataset/sistema-de-informacion-geografica-de-parcelas-agricolas-de-la-comunitat-valenciana-lpis-2022
https://descargas.icv.gva.es/dcd/14_mediorural/03_pac/2022_LPIS_0050/?tipo=directa&formato=shp
2. Convert the LPIS File of Your Community to a Spatialite Database
The method to obtain the SQLite will depend on the type of file you can get from your Community's portal.
If your Community provides the data in SHP format, you can follow this post about how to export a SHP (Shapefile) to Spatialite:
- Using QGIS: https://www.cartodruid.es/en/-/importing-shapefile-.shp-files-to-cartodruid-projects-with-qgis
- Using Spatialite GUI: https://www.cartodruid.es/en/-/importacion-de-ficheros-shapefile-shp-a-proyectos-cartodruid
If your Community provides the data through a WFS service, you can follow this tutorial in which we show you how to export a municipality using QGIS and the ogr2ogr utility:
In any of these cases, at the end of this step, you will have a Spatialite database that we will use to load our enclosures table for CartoDruid.
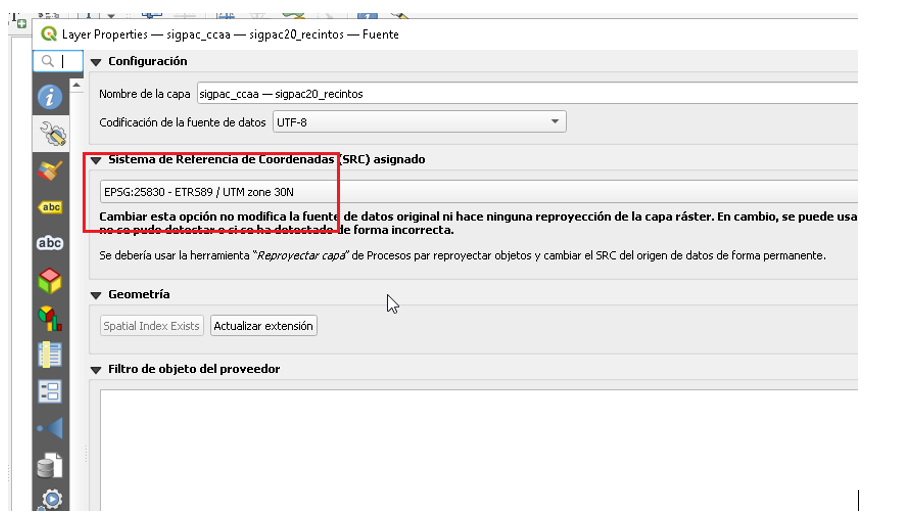
We can open this file directly from QGIS and we will check the Reference System that has been used in this layer. In this case, it is in 25830.
If you want to know more about Reference Systems, take a look at this article (https://www.cartodruid.es/-/codificacion-sistemas-referencia-epsg-srid ).
3. Create the Definitive LPIS Layer and Copy Data from the Downloaded File
In the previous step, you have obtained a SQLite-Spatialite database; now we are going to create a database with the definitive structure. In this part of the post, we will use as an example the downloaded file of the enclosures layer of Andújar that we downloaded in this article: https://www.cartodruid.es/-/exportar-sigpac-wfs-a-spatialite
Before starting, to facilitate the work, follow these two steps:
1. Create a working folder, for example, c:/my_lpis, and paste there the spatialite database from the previous section with the name lpis_ccaa.sqlite.
2. Open a Windows console, and we will add to your computer's path the folder where the QGIS commands are located, making it easier to execute the following commands. Execute this:
SET PATH=<QGIS_PATH>/bin:%PATH%
You have to execute the rest of the instructions in this same console; if you close it for any reason, you have to reset this variable.
1. Create the Definitive Enclosures Database
First, we are going to launch a script that creates the table structure we need. Copy this file into a create_enclosures.sql file in your working folder.
In this file, you have to put the SRID that you consulted in the previous step, it is marked in yellow the point where you have to edit it.
SELECT load_extension('mod_spatialite');

SELECT InitSpatialMetaData('NONE');
SELECT InsertEpsgSrid(25829);
SELECT InsertEpsgSrid(25830);
SELECT InsertEpsgSrid(25831);
SELECT InsertEpsgSrid(4258);
SELECT InsertEpsgSrid(4326);
SELECT InsertEpsgSrid(3857);

CREATE TABLE "AGRZONA" (
"PK_UID" INTEGER PRIMARY KEY AUTOINCREMENT,
"C_PROVINCIA" INTEGER,
"C_MUNICIPIO" INTEGER,
"C_AGREGADO" INTEGER,
"C_ZONA" INTEGER );

CREATE TABLE "MUNICIPIOS"( "PK_UID" INTEGER PRIMARY KEY AUTOINCREMENT,
"C_PROVINCIA" INTEGER,
"C_MUNICIPIO" INTEGER,
"C_PROVMUN" TEXT,
"D_NOMBRE" TEXT,
"C_PROVMUNINE" TEXT,
Geometry MULTIPOLYGON );

SELECT RecoverGeometryColumn("MUNICIPIOS", "Geometry", 25830, "MULTIPOLYGON", 2);
SELECT CreateSpatialIndex("MUNICIPIOS" , "Geometry");

CREATE TABLE "PROVINCIAS" (
"PK_UID" INTEGER PRIMARY KEY AUTOINCREMENT,
"C_PROVINCIA" INTEGER,
"D_NOMBRE" VARCHAR(15),
"GEOMETRY" MULTIPOLYGON );

SELECT RecoverGeometryColumn("PROVINCIAS", "Geometry", 25830, "MULTIPOLYGON", 2);
SELECT CreateSpatialIndex("PROVINCIAS" , "Geometry");

CREATE TABLE "RECINTOS" ( "PK_UID" INTEGER PRIMARY KEY ASC,
"C_PROVINCIA" INTEGER,
"C_MUNICIPIO" INTEGER,
"C_AGREGADO" INTEGER,
"C_ZONA" INTEGER,
"C_POLIGONO" INTEGER,
"C_PARCELA" INTEGER,
"C_RECINTO" INTEGER,
"C_USO_SIGPAC" TEXT,
"C_COEF_REGADIO" INTEGER,
"C_REFREC" TEXT,
"L_SUP_SIGPAC" DOUBLE,
"C_REFPAR" TEXT,
"Geometry" MULTIPOLYGON );

SELECT RecoverGeometryColumn('RECINTOS', 'Geometry', 25830, "MULTIPOLYGON", 2);
Now execute this sentence:
sqlite3 recintos_25830_2023116_ccaa.sqlite < create_recintos.sql
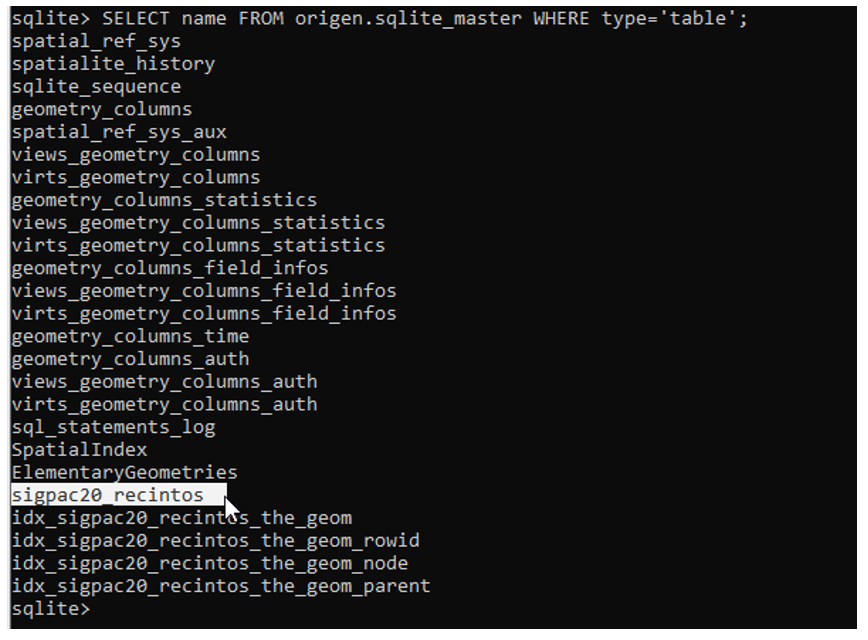
In this case, it is lpis20_enclosures, let's see what schema it has.
pragma origin.table_info("lpis20_enclosures");
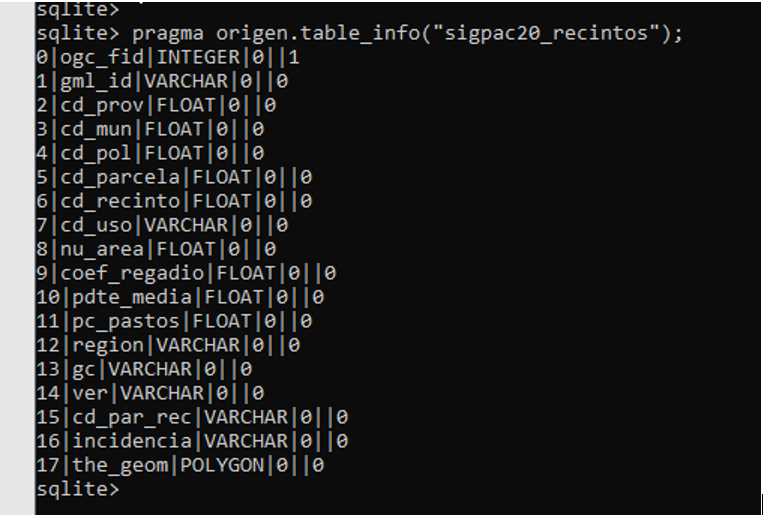
To be able to copy the data, you need to relate the fields of the LPIS of your Autonomous Community with the fields of the destination LPIS layer. Here we see an example:
| Destination field | Source field |
|---|---|
| PK_UID | ogc_fid |
| C_PROVINCIA | cd_prov |
| C_MUNICIPIO | cd_mun |
| C_AGREGADO | not informed in the source layer, we set 0 |
| C_ZONA | not informed in the source layer, we set 0 |
| C_POLIGONO | cd_pol |
| C_PARCELA | cd_parcela |
| C_RECINTO | cd_recinto |
| C_USO_SIGPAC | cd_uso |
| C_COEF_REGADIO | coef_regadio |
| C_REFREC | Calculated later |
| L_SUP_SIGPAC | nu_area |
| C_REFPAR | Calculated later |
| Geometry | the_geom |
And now we build a query to insert the geometries from the source table to the destination:
insert into enclosures (PK_UID,C_PROVINCIA,C_MUNICIPIO,C_AGREGADO,C_ZONA,
C_POLIGONO, C_PARCELA,C_RECINTO,C_USO_SIGPAC,C_COEF_REGADIO, L_SUP_SIGPAC, Geometry)
select ogc_fid as PK_UID, cd_prov as C_PROVINCIA, cd_mun as
C_MUNICIPIO, 0 as C_AGREGADO, 0 as C_ZONA, cd_pol as C_POLIGONO,
cd_parcela as C_PARCELA, cd_recinto as C_RECINTO, cd_uso as C_USO_SIGPAC,
coef_regadio as C_COEF_REGADIO, nu_area as L_SUP_SIGPAC,
CastToMultiPolygon(the_geom) as Geometry
from origin.lpis20_enclosures;
The CastToMultiPolygon function is used in the geometry field to force the creation of a multipolygon type geometry. Make sure that the name of the source table and fields is correct.
After executing that statement, we can check the number of records in the final table with this query:
SELECT COUNT(1) from ENCLOSURES;
4. Load Auxiliary Layers, Compress and Create Spatial Indexes
Last step, now that we have our enclosures loaded, we need to create some auxiliary tables and indexes that CartoDruid uses for searches.
1. Download this database that contains the provinces and municipalities of Spain, we will need it to load the auxiliary layers. Paste it in the same working folder.
https://ftp.itacyl.es/cartodroid/lpis/provmuni/4258/2018/provmun_4258_2018_spain.sqlite
2. Execute the following sentences:
attach 'provmun_4258_2018_spain.sqlite' as p;
insert into municipalities  ("C_PROVINCIA", "C_MUNICIPIO", "C_PROVMUN", "D_NOMBRE", "C_PROVMUNINE")
select "C_PROVINCIA", "C_MUNICIPIO", "C_PROVMUN", "D_NOMBRE", "C_PROVMUNINE" FROM p.municipalities p;

insert into provinces  ("C_PROVINCIA", "D_NOMBRE")
select "C_PROVINCIA", "D_NOMBRE"
FROM p.provinces p;

insert into agrzone  ("C_PROVINCIA", "C_MUNICIPIO", "C_AGREGADO", "C_ZONA")
select distinct "C_PROVINCIA", "C_MUNICIPIO", "C_AGREGADO", "C_ZONA
FROM enclosures;

select ">> Creating numeric indexes";
create index IDX_REFERENCE on enclosures (c_provincia, c_municipio, c_agregado, c_zona, c_poligono, c_parcela, c_recinto);
create index IDX_REFREC on enclosures (c_refrec);

-- In this case, the pk_uid field is not a primary key because the table was created from ogr2ogr, so we create an index

create index IDX_PKUID on enclosures (pk_uid);

select "Compressing geometries";
SELECT DisableSpatialIndex('enclosures','geometry');
update enclosures set geometry = compressGeometry(geometry);

-- re create geometry index
select ">> Creating geometry index and triggers";
SELECT CreateSpatialIndex('enclosures', 'Geometry');
SELECT RebuildGeometryTriggers('enclosures', 'Geometry');

-- We create the 23-digit LPIS reference and the parcel reference
update enclosures set c_refrec = printf("%02d%03d%03d%02d%03d%05d%05d", c_provincia, c_municipio, c_agregado, c_zona, c_poligono, c_parcela, c_recinto);
update enclosures set c_refpar = printf("%02d%03d%03d%02d%03d%05d", c_provincia, c_municipio, c_agregado, c_zona, c_poligono, c_parcela);
After following these steps, you now have your layer ready to be used in a CartoDruid project, in the next step we will see an example of project configuration.
5. Load Our LPIS Layer in CartoDruid
To use your LPIS layer on your mobile device, you will need to copy the file enclosures_25830_2023116_ccaa.sqlite to your device and define a CartoDruid project to use the layer.
1. You can copy the file to any path on your mobile device, CartoDruid scans your mobile's cards to locate SQLite databases. We recommend having a /cartorepo folder with the cartography shared between projects to save space.
2. To work with your LPIS layer, you will need a CartoDruid project that includes it. Here we leave you an example project, download the XML file and modify the parts highlighted in red to adjust them to your case:
<entry>
      <string>ENCLOSURES_2023</string>
      <es.jcyl.ita.crtcyl.core.model.VectorialLayer>
      ...
            <dataTable>enclosures</dataTable>
            <dbURL>enclosures_4258_20230131.sqlite</dbURL>
            <indexTable>idx_enclosures_Geometry</indexTable>
            <resourceid>enclosures</resourceid>
            <srid>4258</srid>
            <version>20230131</version>
      ...
        <srs>4258</srs>
      ...
</entry>
3. Copy the XML file to the /cartodroid/config path and open the project from the side menu. Restart CartoDruid and you will see the enclosures layer appear in the side menu.
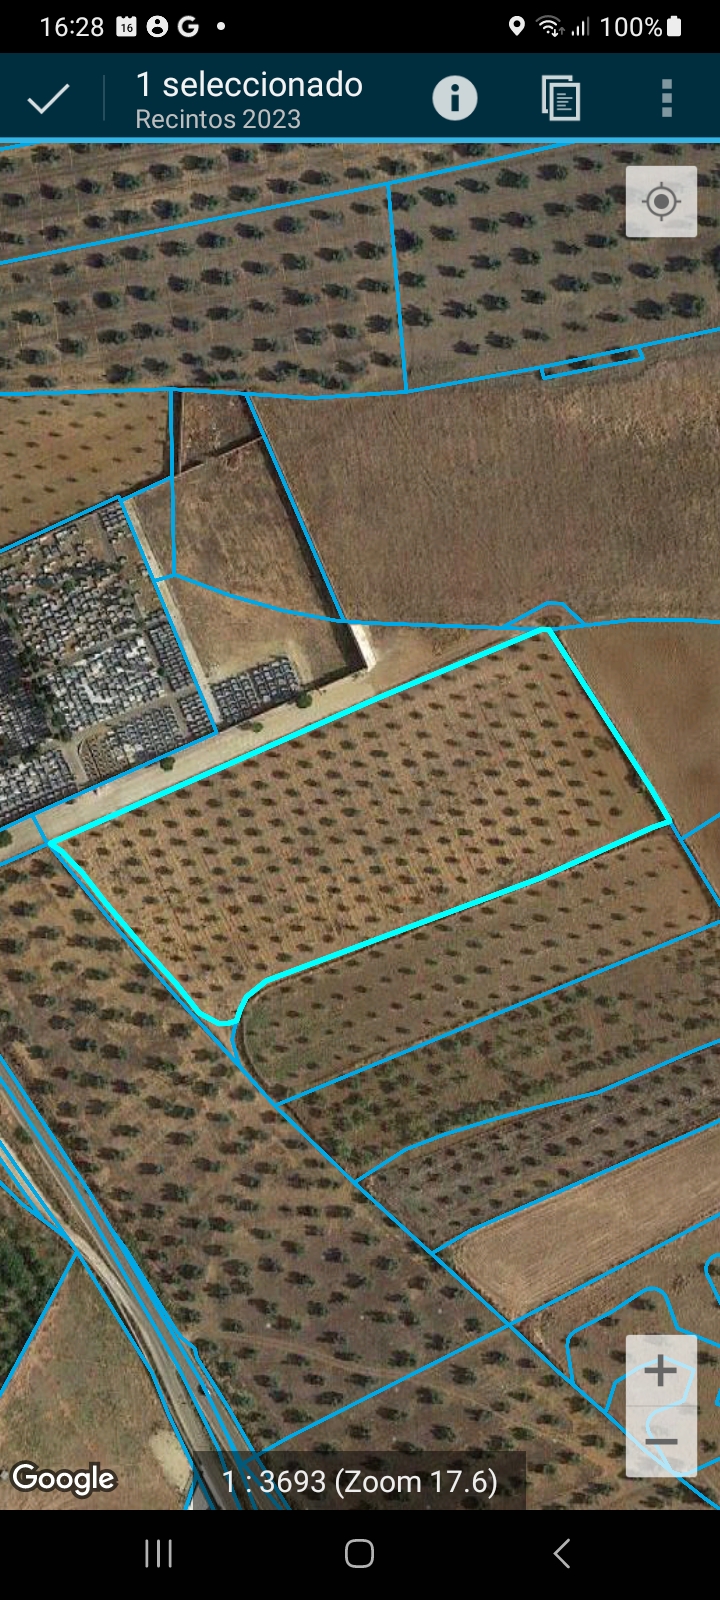
Once you have an enclosures layer, the LPIS search will be activated in the top right menu (three dots) and you can search the enclosures by reference:
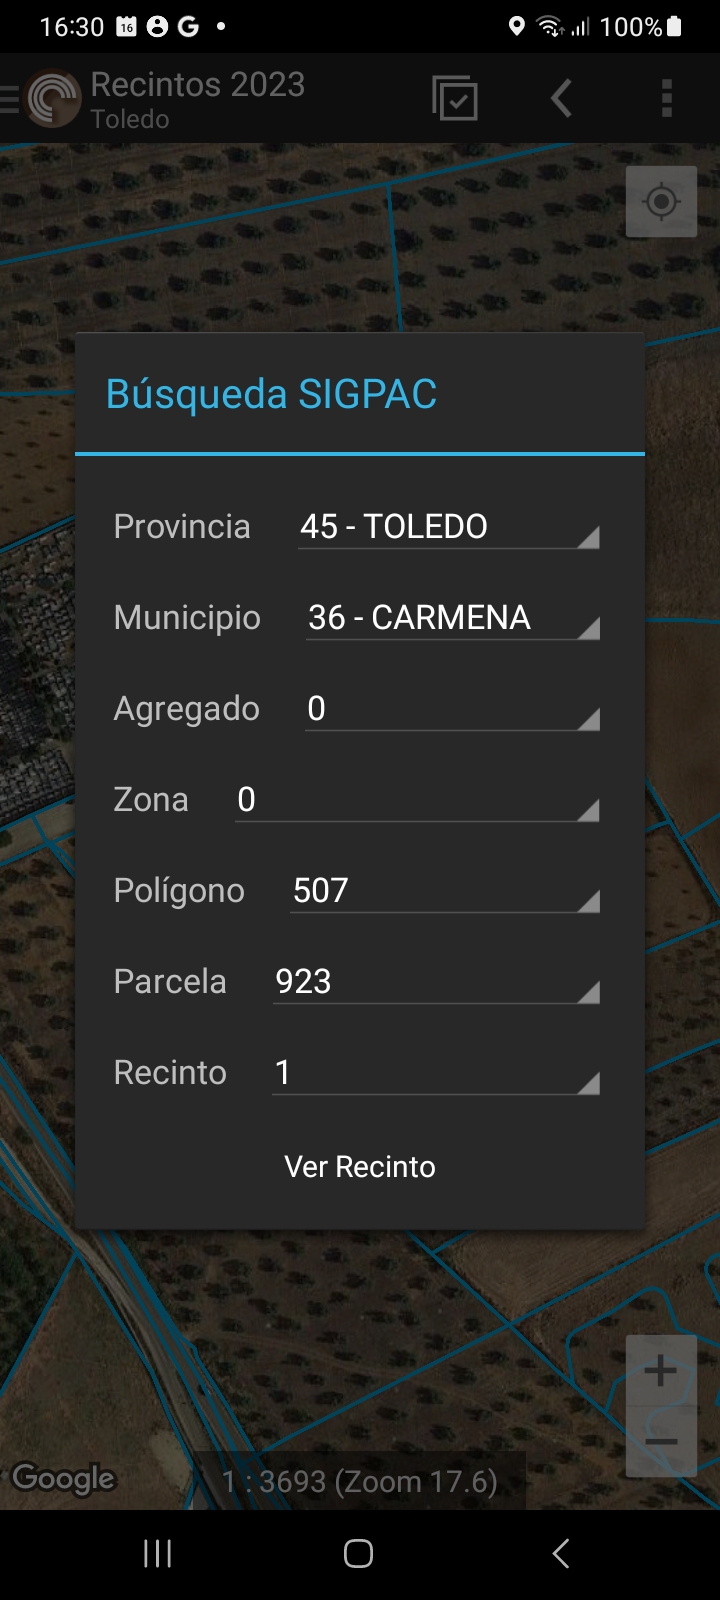
You can now use the LPIS enclosures to perform your field tasks, copy them to your work layers, symbolize by LPIS uses, consult the information of the enclosures, and much more.
We hope this helps you!
References
Regulations on Open Data
- Directive 2003/98/EC Directive 2003/98/EC of the European Parliament and of the Council of 17 November 2003 on the re-use of public sector information, amended by the Directive 2013/37/EU.
- Law 37/2007, of 16 November, on the reuse of public sector information (RIS).
- https://datos.gob.es/es/documentacion/open-data-publicacion-y-reutilizacion-de-datos-abiertos-como-iniciativa-de-gobierno